Installation
Install the plugin from WordPress.org or upload the ZIP file via Plugins → Add New → Upload. Activate the plugin. A new "Proof & Validate" menu appears in the admin sidebar.
Requirements: WordPress 5.8+, PHP 7.4+
Everything you need to get started with Meetempo Client Proof & Validate
Install the plugin from WordPress.org or upload the ZIP file via Plugins → Add New → Upload. Activate the plugin. A new "Proof & Validate" menu appears in the admin sidebar.
Requirements: WordPress 5.8+, PHP 7.4+
Two methods are available:
[wppv_approve] in any post or page.Compatible with all page builders: Elementor, Divi, Beaver Builder, WPBakery.
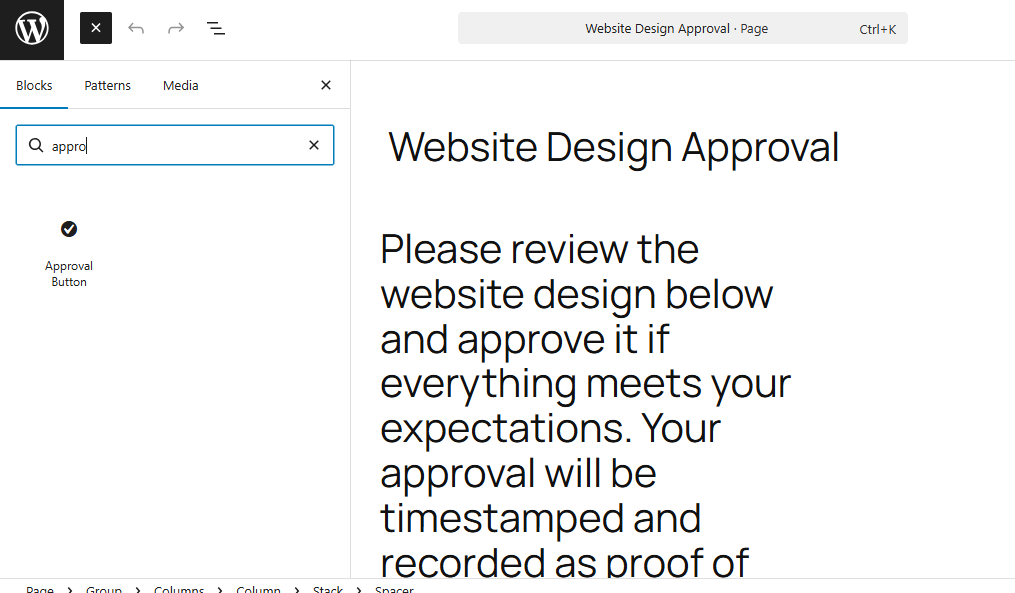
When a visitor opens the page, they see an approval form with: full name, email address, and an "Approve this document" button. The form is fully responsive and works on mobile devices.

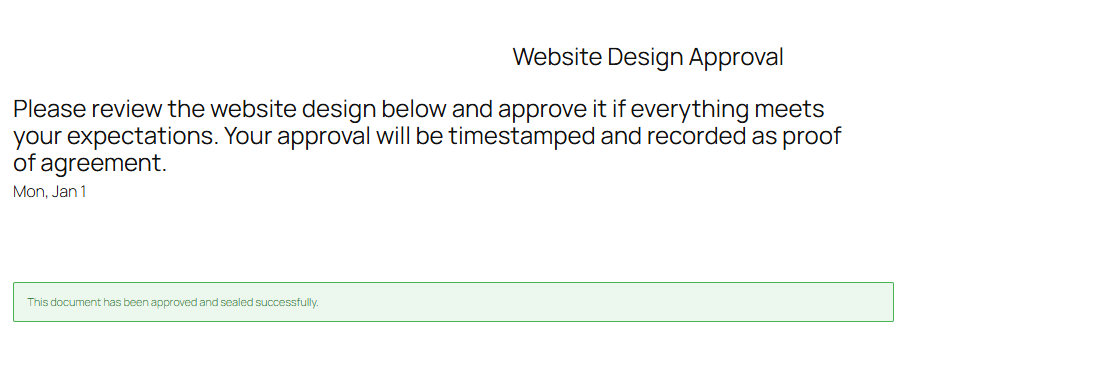
After validation, the client sees a success message confirming that their approval has been recorded and timestamped.
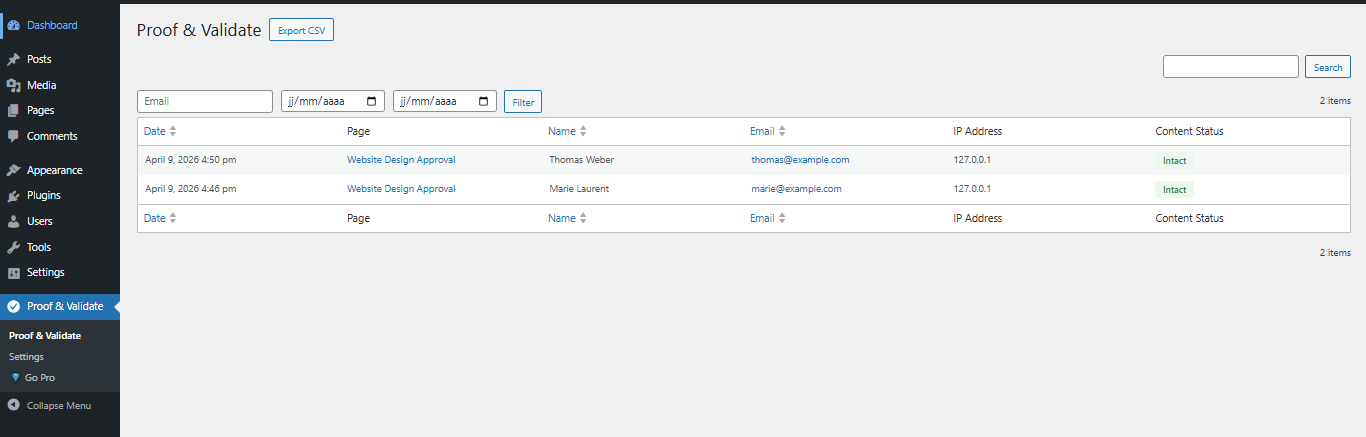
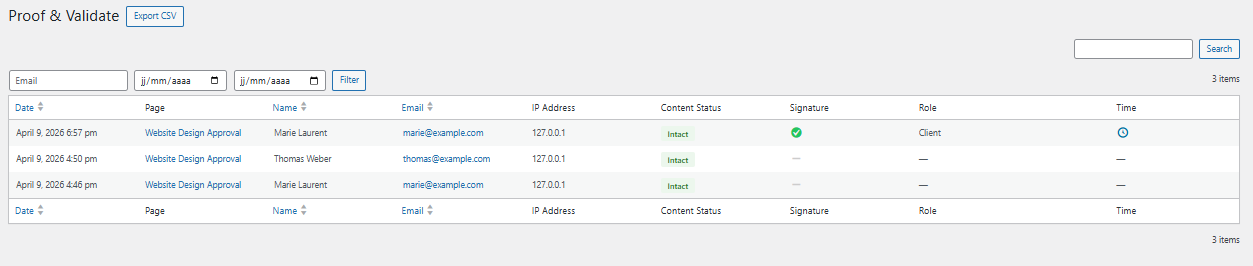
All approvals are listed in the admin dashboard. Each entry shows: date, page, name, email, IP address, and the content status:
Filters available: by email, by date. One-click CSV export.
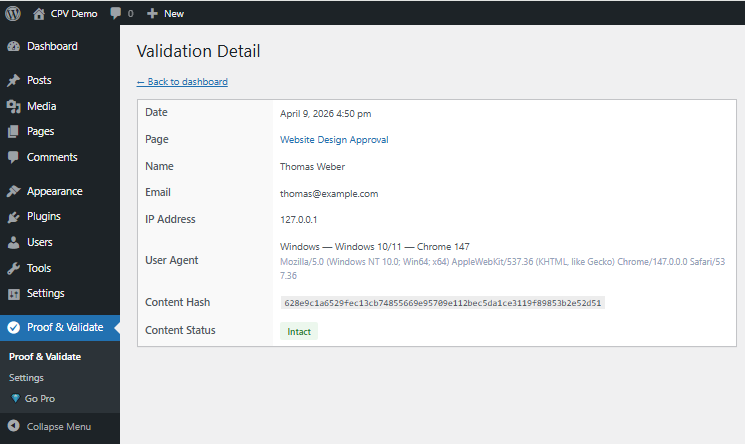
How to access the full validation detail
Click on the client's email address in the table. This opens the detail page with all proof data: SHA-256 hash, user agent, exact timestamp, and more.
The detail page shows all proof recorded at the moment of approval:
The SHA-256 hash proves that the content was not modified after the client approved it. If the content changes, the status switches from "Intact" to "Modified".
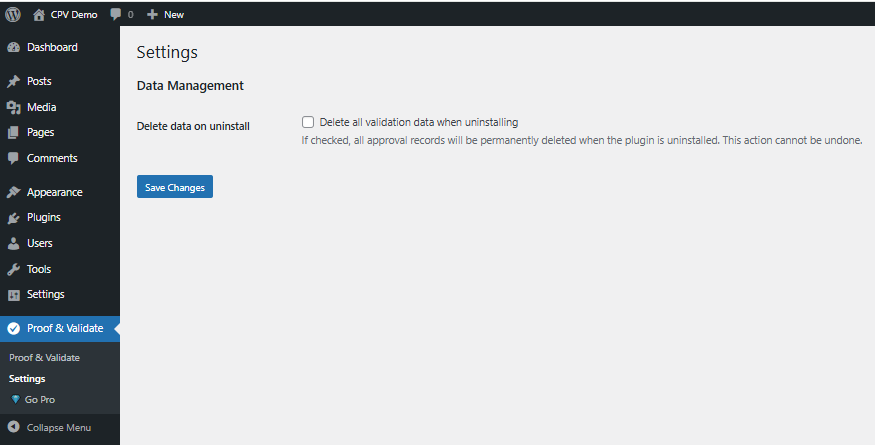
The Settings page lets you configure whether to delete all plugin data on uninstall. By default, data is preserved so you never lose proof records accidentally.
The PRO add-on extends the free plugin with professional features. It requires the LITE version installed and active. All PRO features are unlocked with a single license key.
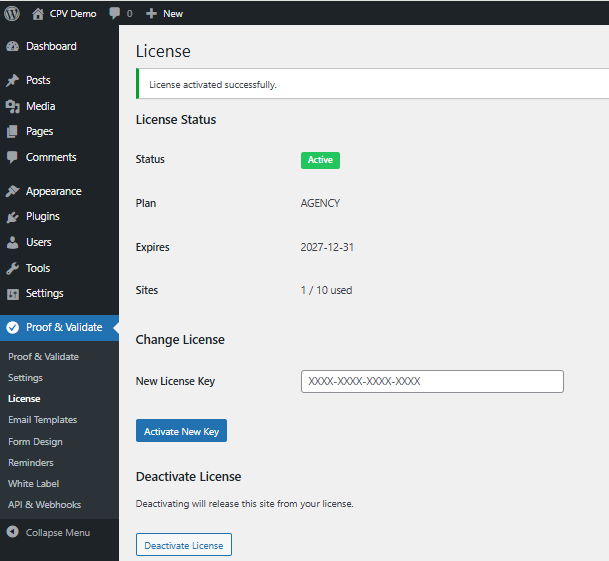
After purchase, enter your license key in Settings → License. The license activates immediately and shows your plan (PRO or AGENCY), expiration date, and number of sites used.
Clients can draw their signature directly in the approval form using a touch-compatible canvas. The signature is stored alongside the approval record and appears in the validation detail and PDF certificate.
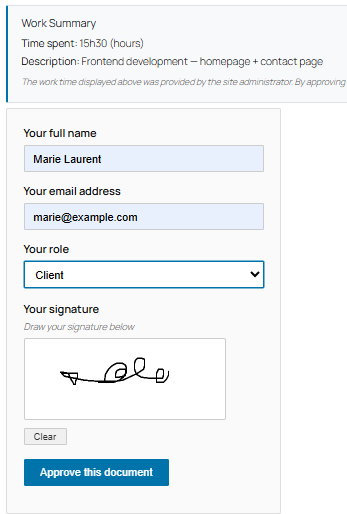
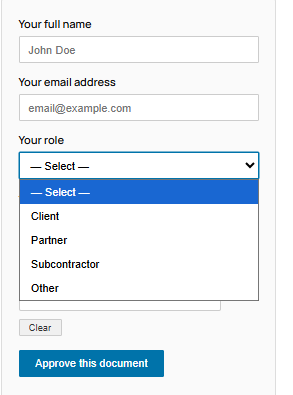
A dropdown field is added to the form allowing the validator to specify their role: Client, Partner, Subcontractor, or Other. This role is displayed in the dashboard and validation detail.
For each approval, a professional PDF certificate is generated containing all proof data: document information, SHA-256 hash, approval details, work time acknowledgment, and the client's signature.
Where to find the PDF download
The "Download PDF Proof" button is on the validation detail page. To access it, click on the client's email in the dashboard.
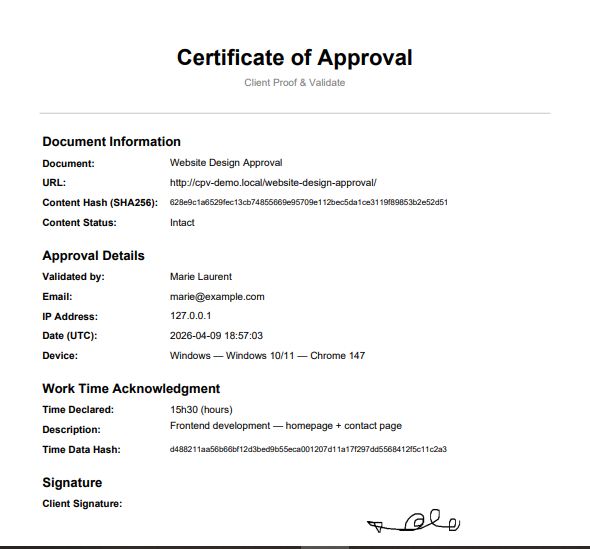
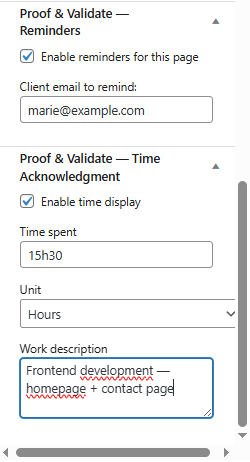
Administrators can declare the time spent on a project directly in the page editor. The client sees a "Work Summary" box above the approval form showing the declared time and description.
By approving, the client acknowledges the time displayed. This creates a timestamped proof of time acknowledgment, useful for billing disputes.
The admin dashboard displays additional columns for PRO data: Signature status, Role, and Time. This gives you an instant overview of all approvals with their PRO metadata.
Click on the client's email to access the full detail: PDF, signature, hash, and time.
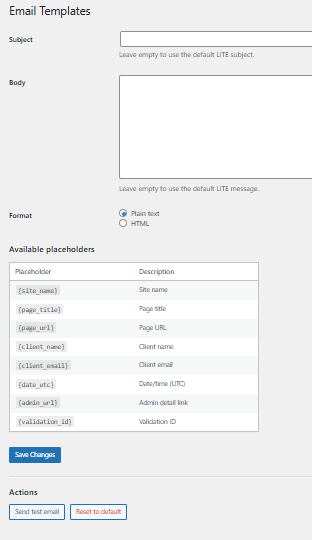
Customize the notification email sent to the site administrator after each approval. Use placeholders to personalize the content:
{client_name} ·
{page_title} ·
{page_url}
Choose between plain text and HTML format.
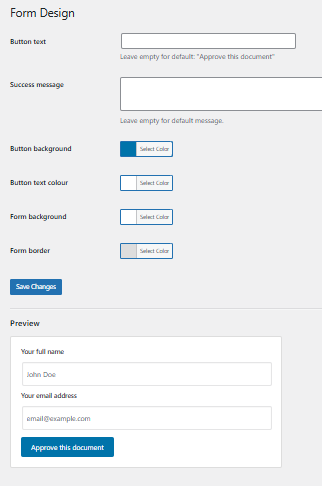
Customize the appearance of the approval form: button text, button colors, form background, and border color. A live preview shows changes in real time.
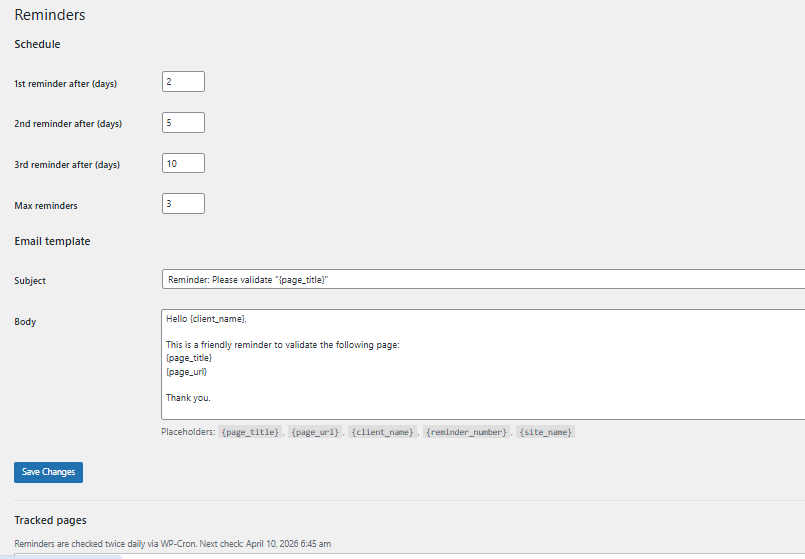
Automatically remind clients who haven't validated yet. Configure up to 3 reminders at custom intervals (e.g., 3 days, 7 days, 14 days). Customize the reminder email with placeholders. Reminders are sent automatically via WP-Cron.
The Reminders panel in the page editor lets you enable reminders per page and set the client's email.
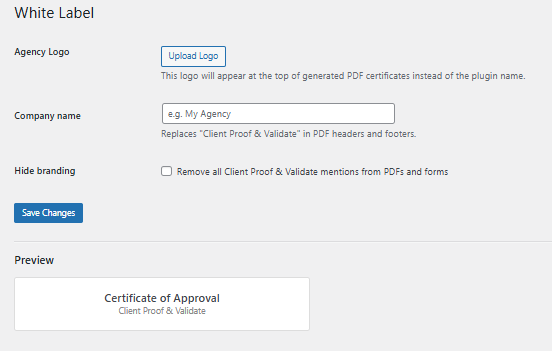
Replace the plugin branding with your own. Upload your agency logo, set your company name, and optionally remove all "Client Proof & Validate" mentions from PDFs and forms.

Integrate approval data with your tools. Enable webhooks to receive a POST request whenever a validation is recorded. Use the REST API to query validations programmatically with a secure API key.
# Available endpoints
GET /wp-json/wppvpro/v1/validations
List all validations
GET /wp-json/wppvpro/v1/validations/{id}
Get a single validation
In the admin dashboard (Proof & Validate), click on the client's email address in any row. This opens the full detail page with all proof data, hash, signature, and PDF download.
The LITE version provides unlimited approval tracking with timestamping, SHA-256 hashing, and IP logging. PRO adds: handwritten signatures, PDF certificates, custom email templates, form customization, smart reminders, validator roles, time acknowledgment, and WooCommerce integration. The AGENCY plan adds white-label and API/webhooks.
No. The PRO is an add-on that requires the free LITE version installed and activated. Install the free version from WordPress.org first, then upload the PRO ZIP.
You get 7 days of full access with no credit card required. After the trial, you'll be asked to add a payment method to continue.
PRO Freelance covers 1 site. AGENCY covers up to 10 sites. You can deactivate and move your license anytime.
We capture the client's full name, IP address, browser info, and exact timestamp. This constitutes a strong audit trail accepted in most jurisdictions.
Start with the free version or unlock all features with PRO.